I’ll never forget the cardboard-box-and-sawdust cereal of my 90s childhood. You know the one. It was a punishment, something you ate while glaring at your sibling’s box of colorful, sugar-bombed marshmallows. It took me years, and a serious nudge from my doctor about, ahem, keeping things moving, to give bran flakes another shot. And let me tell you, the stuff you can make at home? It’s a revelation. This isn’t punishment. This is a nutty, toasty, deeply satisfying crunch that makes you feel like you’re starting your day on the absolute right foot.
Quick Look
| Prep | Cook | Total | Feeds | Level |
|---|---|---|---|---|
| 20 mins | 60-70 mins | ~90 mins | Makes ~6 cups | Beginner |
Why You’ll Love This Recipe
- You control the sugar. Unlike the store-bought stuff that often sneaks it in, you can make this as plain or as subtly sweet as you like.
- The flavor is incredible. Toasting the wheat bran itself unlocks a nuttiness you just won’t find in a box.
- It’s surprisingly flexible. This is a base recipe—your perfect bowl of bran flakes is waiting for you to customize it.
- Seriously, your digestive system will send you a thank-you note.
Grab These
- 3 cups wheat bran (not cereal bran, the plain, raw stuff from the bulk bin or baking aisle)
- 1 cup whole wheat flour
- 1/2 cup old-fashioned rolled oats
- 1/4 cup ground flaxseed (my little power-boost secret)
- 1/2 teaspoon fine sea salt
- 1/4 cup pure maple syrup or honey (or less, if you like it very plain)
- 1/4 cup coconut oil, melted (or a neutral oil like avocado)
- 1 teaspoon vanilla extract
- 1/2 cup + 2 tablespoons water (you might need a tiny bit more)
Let’s Make It
Okay, first things first. Preheat your oven to a nice low 300°F (150°C). This is a low-and-slow situation, which is the secret to getting them crispy without burning. Line a large baking sheet with parchment paper. I don’t mess around here—parchment is your best friend for easy cleanup.
Now, in a large bowl, we’re going to whisk together all our dry friends. That’s the wheat bran, whole wheat flour, oats, flaxseed, and salt. Get in there with a whisk and make sure it’s all one happy, homogenous mixture. This is where you can just take a deep breath and smell that wholesome, earthy goodness. It already smells better than any box, right?
In a smaller bowl or a liquid measuring cup, whisk together the wet ingredients: the maple syrup, melted coconut oil, vanilla, and the water. Now, pour this over the dry ingredients. This is the fun, slightly messy part. Use a sturdy spatula or just dive in with clean hands to mix it all together. You’re looking for a mixture that holds together when you squeeze it, but isn’t outright wet. If it’s too crumbly and won’t hold a clump, add another tablespoon of water. It can vary depending on your flour and bran.
Here’s the key step: we’re not making granola clusters. We want flakes! So, you’re going to take handfuls of the mixture and press, press, press it firmly onto the prepared baking sheet. You want to create a thin, even layer, about 1/4-inch thick. Really compact it. This is what gives you those satisfying flakes later instead of just bran crumbs. Once it’s all pressed out, score the surface lightly with a knife or bench scraper into whatever size flakes you like. Don’t cut all the way through, just about halfway. This is your guide for breaking them apart after baking.
Bake for 30 minutes. Then, pull it out, and carefully break the large sheet along the score lines you made. Flip the individual pieces over. This ensures even cooking and crispness on both sides. Pop it back in the oven for another 30-40 minutes, until they are deeply fragrant, dry, and hard to the touch. Let them cool completely on the baking sheet—they’ll get even crispier as they cool. I know it’s hard, but don’t nibble while they’re warm! They need to cool to achieve their final crunchy texture.
Nutritional Facts (Per 3/4 Cup Serving)
| Nutrient | Amount |
|---|---|
| Calories | ~180 kcal |
| Protein | 6g |
| Carbohydrates | 32g |
| Fat | 6g |
| Fiber | 10g |
| Sugar | 6g |
| Note: Values are estimates |
Variations & Add-Ins
- Cinnamon-Raisin: Add 1.5 teaspoons of cinnamon to the dry ingredients and sprinkle 1/3 cup of raisins over the mixture right after you press it onto the pan before baking.
- Apple Spice: Add 1 teaspoon cinnamon and 1/4 teaspoon nutmeg to the dry mix, and replace the water with unsweetened applesauce.
- Seedy Power Flakes: Add 2 tablespoons each of sunflower seeds and pumpkin seeds to the dry mixture for an extra crunch and protein hit.
Serving Ideas
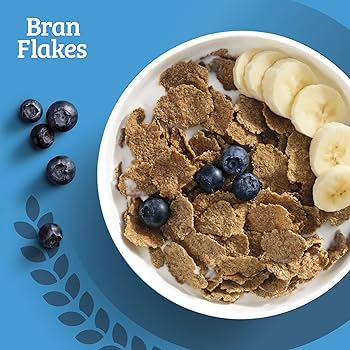
- My absolute favorite way is with cold, whole milk and a handful of fresh blueberries. The creamy, the sweet, the crunchy—perfection.
- For a real treat, I’ll slice a banana over the top and add a dollop of Greek yogurt for extra protein.
- Honestly? It’s also fantastic straight from the jar as a snack. Don’t tell anyone I told you that.
Storage & Reheating
This is crucial. Once your bran flakes are completely, 100% cool, store them in an airtight container at room temperature. A large glass jar is perfect. They’ll keep for about 2 weeks. If they lose a little crunch (which they might in a humid kitchen), you can spread them on a baking sheet and toast them in a 300°F oven for 5-10 minutes to crisp them back up.
My Two Cents
Don’t rush the cooling process. I’ve ruined a batch by getting impatient and sealing them in a container while still slightly warm. They steam themselves and go from perfectly crisp to tragically chewy. Let them cool on the sheet, no matter what!
You Asked, I’m Answering
- “Can I use something besides coconut oil?” Absolutely! Any neutral oil works. Avocado oil, grapeseed oil, or even a light olive oil would be fine. The coconut oil gives a very subtle flavor that I love.
- “Mine turned out a bit crumbly, not flaky. What did I do wrong?” You probably didn’t press the mixture firmly enough onto the baking sheet. Really put some muscle into it next time! The compaction is what creates the flake structure.