I’ll never forget the specific, golden-brown scent of my dad’s Saturday morning pancakes. It was the one day he took over the kitchen, and the sound of batter hitting the hot griddle was my alarm clock. He never used a recipe, just a swoosh of this and a glug of that from the fridge. For years, I tried to replicate his perfect, fluffy cakes and failed miserably. Mine were either leaden or raw in the middle. It took me a solid decade of tinkering—and finally stealing his secret, which was a whisper of nutmeg—to land on this, my absolute go-to, never-fail, holy-grail buttermilk pancake recipe. This is the one.
Quick Look
| Prep | Cook | Total | Feeds | Level |
|---|---|---|---|---|
| 10 mins | 15 mins | 25 mins | 3-4 people | Easy |
Why You’ll Love This Recipe
- The fluff is real. A little baking soda and a rested batter gives you clouds you can eat.
- They’re not too sweet. This is crucial in my book. A pancake should be a canvas for your maple syrup, not compete with it.
- They freeze like a dream. Make a double batch and you’ve got weekday breakfasts sorted for a week.
Grab These
- 2 cups all-purpose flour (I swear by King Arthur)
- 2 tablespoons granulated sugar
- 1 teaspoon baking powder
- 1 teaspoon baking soda
- 1/2 teaspoon fine sea salt
- A tiny, generous pinch of grated nutmeg (my dad’s secret, don’t skip it!)
- 2 large eggs
- 1 ¾ cups well-shaken buttermilk (see, this is important)
- ¼ cup melted unsalted butter, plus more for the griddle
- 1 teaspoon pure vanilla extract
Let’s Make It
Okay, first thing’s first: don’t overmix. I’m serious. Lumpy batter is good batter. If you mix it until it’s smooth, you’ll develop the gluten and get tough, chewy pancakes. And nobody wants that. So, in a large bowl, whisk together your flour, sugar, baking powder, baking soda, salt, and that all-important nutmeg.
In another bowl or a large liquid measuring cup, whisk the eggs, buttermilk, melted butter, and vanilla until just combined. Now, pour the wet ingredients into the dry. Take your whisk or a spatula and gently, I mean gently, fold it all together. Stop when there are still streaks of flour. It should look a little shaggy and very lumpy. Walk away. Let it rest for 5-10 minutes on the counter. This lets the flour hydrate and the leaveners start to party, which is what gives us that beautiful rise.
While the batter is resting, heat your griddle or a large non-stick skillet over medium heat. This is another place people go wrong—too hot and the outside burns before the inside cooks. You want it properly preheated. Test it by flicking a few drops of water on it; if they dance and sizzle away, you’re golden.
Lightly butter the griddle. Now, for the perfect pancake, I use a ⅓-cup measuring cup to pour the batter. Leave some space between them—they need room to spread and puff. You’ll know it’s time to flip when the edges look set and little bubbles form on the surface and pop, leaving little holes. Don’t be trigger-happy. Wait for the bubbles.
Slide your spatula underneath and flip with confidence! They should be a gorgeous, even golden brown. Cook for another minute or so on the second side, until they’re puffed and cooked through. You can peek if you’re nervous.
Nutritional Facts (Per Serving, 2 pancakes)
| Nutrient | Amount |
|---|---|
| Calories | ~ 320 kcal |
| Protein | 9g |
| Carbohydrates | 45g |
| Fat | 11g |
| Fiber | 1g |
| Sugar | 10g |
| Note: Values are estimates |
Variations & Add-Ins
- Lemon Poppy Seed: Add the zest of one lemon and a tablespoon of poppy seeds to the dry ingredients. It’s a game-changer.
- Chocolate Chip: After you pour the batter onto the griddle, sprinkle a few chocolate chips onto each pancake. Pushing them into the batter prevents burning.
- Cinnamon Swirl: Mix ½ cup of sugar with a heaping tablespoon of cinnamon. After pouring the batter, dollop a teaspoon of this mixture on top and swirl it in with a toothpick.
Serving Ideas
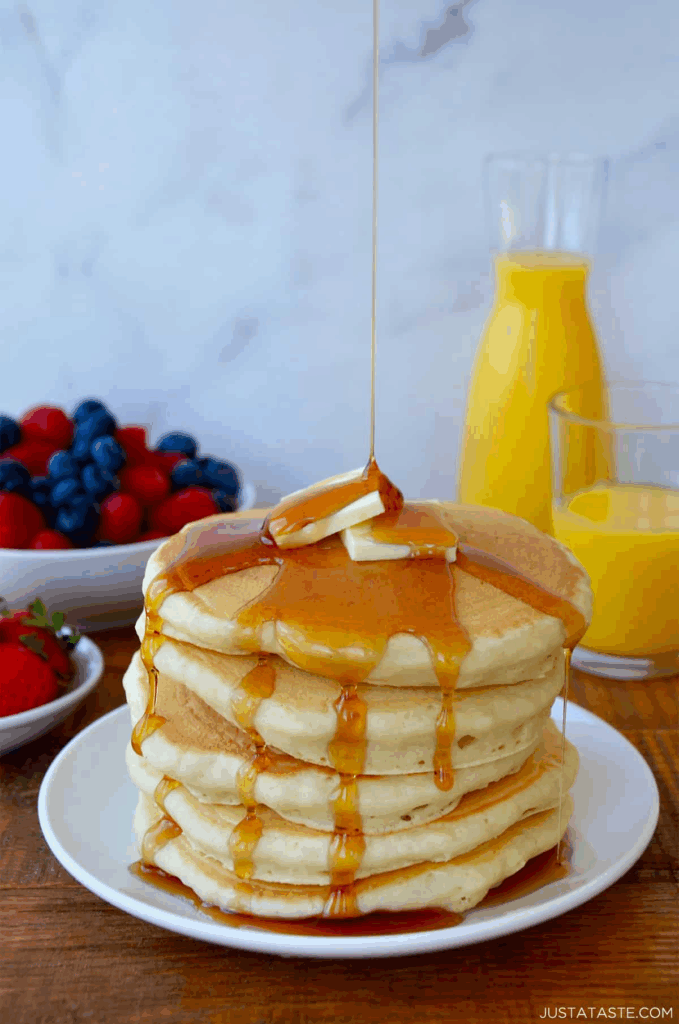
- The classic: a tall stack with a pat of salted butter melting between the layers and real maple syrup (please, not the fake stuff!) cascading down the sides.
- For a special brunch, I love them with a dollop of Greek yogurt and a pile of macerated berries.
- My husband’s favorite: with a side of crispy, thick-cut bacon for that perfect sweet-salty bite.
Storage & Reheating
Let them cool completely on a wire rack. Then, you can stack them with parchment paper in between and pop them in a zip-top bag. They’ll keep in the fridge for 2 days, or in the freezer for up to 3 months. To reheat, don’t you dare use the microwave—it makes them soggy. Toast them or warm them in a 350°F oven until they’re hot and crisp-edged again.
My Two Cents
That batter rest. I know, you’re hungry, you want pancakes now. But trust me, those 5-10 minutes of patience are the difference between a good pancake and a legendary one. It’s non-negotiable in my kitchen.
You Asked, I’m Answering
“Can I make the batter the night before?”
Oh, I don’t recommend it. The baking soda will lose its oomph and you’ll end up with flat pancakes. The 10-minute rest is all you need, I promise.
“My pancakes are always raw in the middle! Help!”
This almost always means your griddle is too hot. The outside is cooking too fast, locking in the raw center. Turn the heat down to medium-low and give them time. Cooking is about patience, not power.